How to use Novelize

How to write a novel with Novelize
We’ve built Novelize to be fairly intuitive. But we have found that many users don’t feel comfortable clicking around. Instead, they’d prefer to receive some instructions on what exactly they need to do to get the most out of Novelize.
How to add scenes and chapters

When you're inside your first novel, you'll have your first chapter and first scene set up for you. To add more, scroll down to the bottom of the page. You can add additional scenes or chapters with the click of one button. You can add scenes and chapters in the write and outline mode of your novel.
What are scene notes?

Every scene includes scene notes, found at the end of each scene. You’ll see the link to open ‘notes’ on the bottom right underneath your scene in write mode. When you’re in outline mode, you will not see the scene body but only the notes to help you edit them. In write mode, you can open them up to help you write your scene.
What are chapter descriptions?
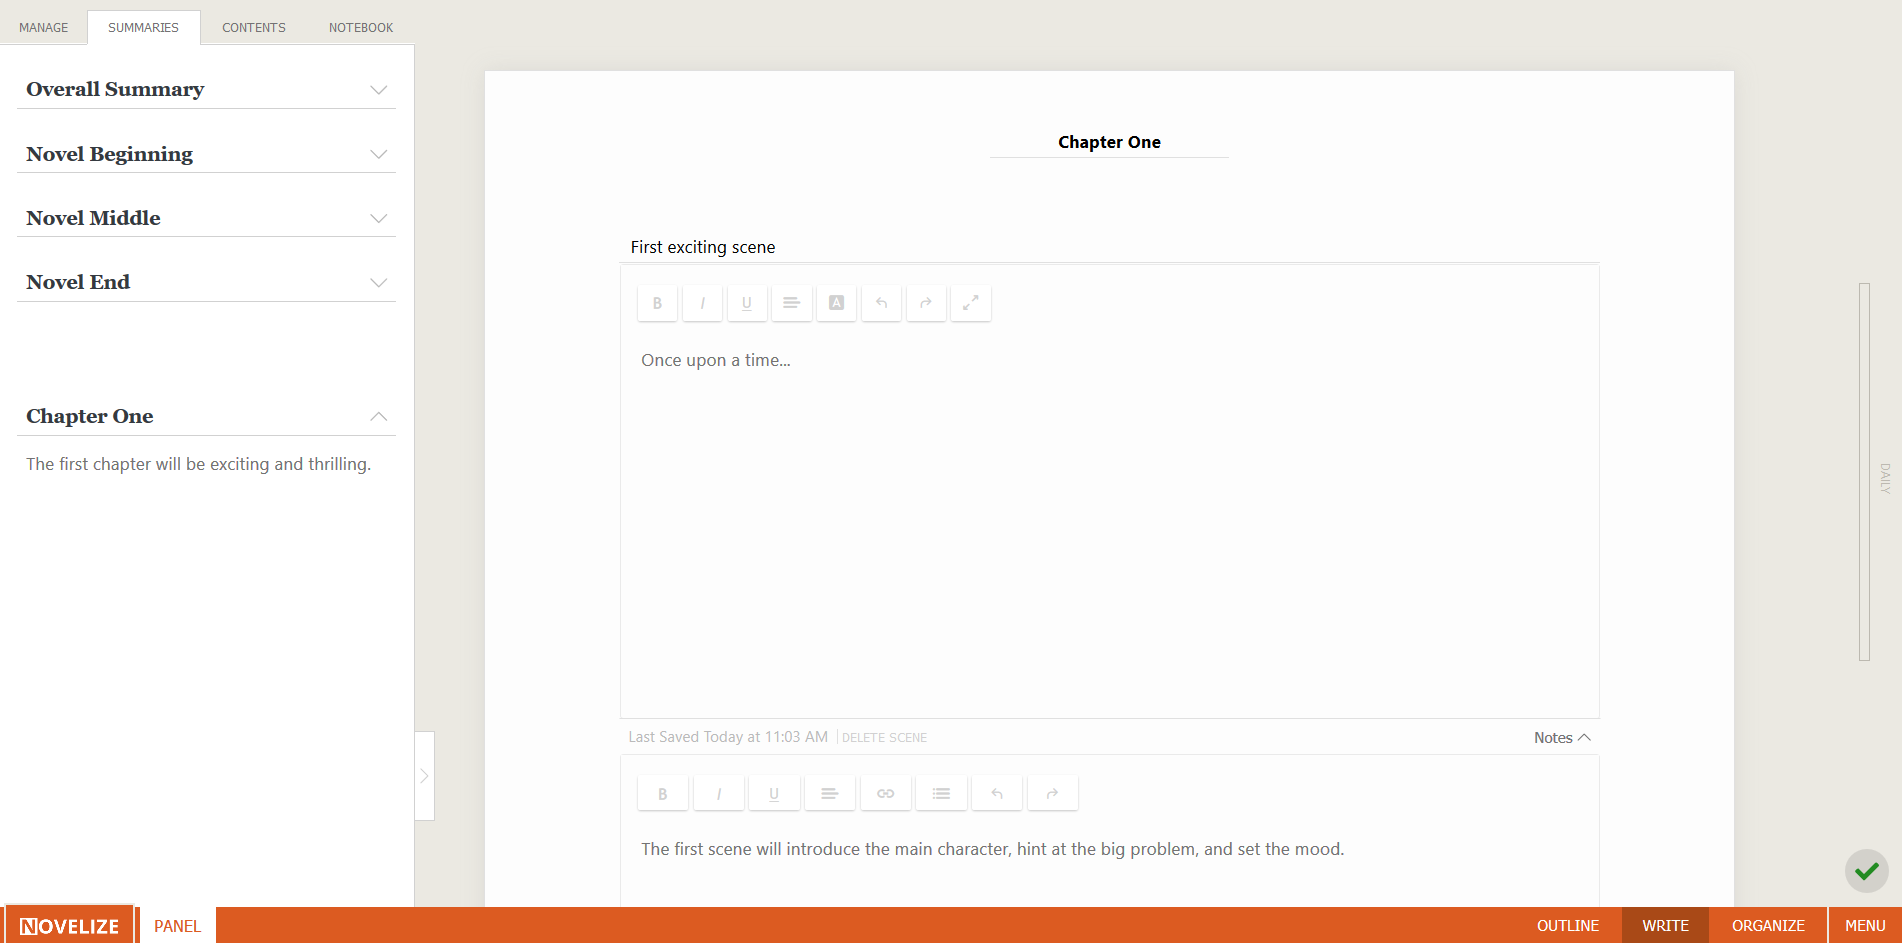
If you prefer to write descriptions for entire chapters, you can do so in outline mode. These descriptions will then be visible in the panel on the left when you click on the ‘summaries’ tab. Chapter descriptions and scene notes are helpful for outlining your novel. However, you should know that this text is not included in your total word count for your novel.
The UNDO button

The undo button is the arrow pointing to the left right next to the letter “A”.
Everyone has done it. You accidentally select a bunch of text with your mouse and hit delete. Oops. Fortunately, you can undo this and any other action by clicking on the undo button that’s found in the formatting bar of each scene. Alternatively, you can use the keyboard shortcuts CTRL+Z. Just be sure to do it before refreshing or leaving the page.
If you ever delete an entire chapter or scene by using the delete button and change your mind about it the next day, then we can still recover it for you. We store deleted scenes and chapters for 30 days on the back-end before purging them out of the system. Just send us a quick email, and we’ll send you what you’re looking for.
How to manage your novel details

To change the title, subtitle, or author name for your novel, click on the ‘manage’ button at the top of the panel. You can also change your novel’s genre and adjust your word count goals in that same location.
Table of contents and summaries
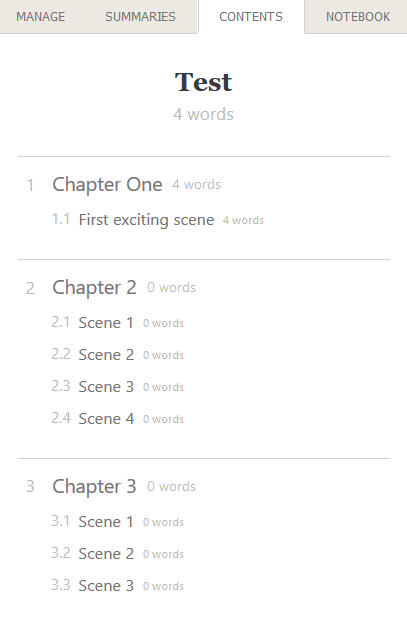
If you like to outline, then your first step will be to write a summary of your book. This summary is displayed in the panel on your left. This panel defaults to showing you the table of contents. The table of contents also displays the word count for each scene and chapter you have written. As your novel gets longer, you can use the table of contents to quickly go to the scene you want.
How to use the notebook
The notebook is something we’re really proud of, because it solves one of the biggest headaches for writers. Where do you record the information you need to write your novel but that can’t go directly into the story? Many writers use post-it notes. Fantasy writers may even have 3-ring binders containing all that information.
Store your information in the notebook
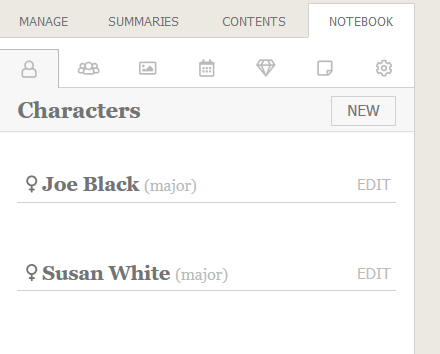
With Novelize, you have a safe place to store details about your characters, dates, locations, and more without leaving your writing screen. Simply click on ‘notebook’ on the left side above the panel. You can open and close the notebook panel on the left by clicking the ‘panel’ button at the bottom left of your screen. To expand the notebook and add width, click on the arrow near the bottom of the panel.
How to manage the notebook
The notebook is connected to your novel. But you can use the same notebook for your next novel. This is especially helpful if you’re writing a series, because you’ll probably have many of the same characters.
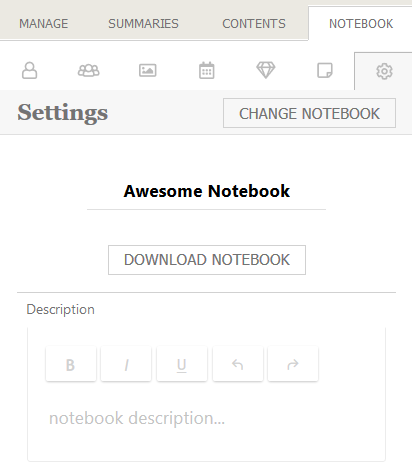
Each icon represents a different section of the notebook, including characters, locations, and dates. When you hover on the icons, it tells you what they’re for. The last icon on the right – looks like a gear – is the settings button for the notebook. Here is where you can change the name of your notebook, switch to a different notebook for this novel, download a copy of the notebook, or add a description.
Using custom dates
If you’re building a world that doesn’t use the same calendar as our modern world, you may not want to use a calendar date, and instead use a free-form label. The Custom Dates option was created for just that purpose. All dates will have the standard calendar format by default, but feel free to change it if needed.
Outline, write & organize your novel

Do you like to outline? No problem. We have an outline mode. Do you just want to write? No problem. Just stay in the write mode and start typing. Do you want to reorganize your scenes and chapters? We’ve got you covered there, too. You can switch writing modes by clicking on the corresponding words at the bottom right of your screen
Outline
In outline mode, you’ll have access to your book summary, chapter descriptions, and scene notes. Any text you put in here will not show up in the manuscript export, because these notes are not part of your final draft. They also don’t count towards your total word count. That doesn’t mean it’s not important for you to spend some time in this mode. Outlining is a great strategy to get the thoughts out of your head and help you build up your story.
Write
After you’re done outlining, you can switch to the write mode. Here your scene notes will carry over so you can use them to write your scenes. Click the ‘scene notes’ button underneath the scene to view the notes you’ve created. To display your novel summaries and chapter descriptions, open the panel by clicking ‘panel’ on the bottom left. Then select the ‘summaries’ tab on the top.
Organize
No matter how much time you spend on outlining your novel, it’s possible that you don’t like the order of events in your novel later. Fortunately, we have an organize mode that makes it easy to move scenes and chapters around. Simply click on the ‘organize’ button at the bottom of the page.
We switched from the drag-and-drop to clicking the up-and-down arrows for the outline mode. This makes it possible to organize your novel on small screens, too. However, we have plans to go back to the drag-and-drop, because it’s much easier to use.
Word count goals
Goal setting plays a huge role in novel writing. After all, having a goal keeps you accountable, and it also tells you when you’re done. There are different ways to accomplish this. You can set a goal of writing for a certain amount of time each day, or you could set word count goals for your day, week, or for your entire novel. Word count goals are easy to keep track of inside of Novelize.
Keeping track
When you’re writing your novel, you may notice a progress bar on the right side of the screen. This represents your word count goals. As you keep writing, the bar will slowly turn orange. It can display your daily, weekly, or overall goal, depending on which one you choose to view.
Change your word count goals

To adjust your word count goals and change which one is displayed with the progress bar, click the ‘manage’ tab inside of the panel. The word count details are displayed underneath your novel information. You can adjust these numbers anytime. There is a drop down at the bottom that lets you choose whether your daily, weekly, or overall progress is displayed via the progress bar on the right of the screen. For example, if you want to see that bar turn orange as you meet your daily goal, you should set it to ‘daily’.
Weekly email reminders

The one thing that will stop you from finishing your novel is not making writing a priority. And we get it. There are many other things that are clamoring for your attention. To help with that, we have created a weekly progress report that summarizes how far you’ve come this week, and whether you’ve met your goals or not.
You can sign up for these emails by clicking on the ‘manage’ tab inside the panel and selecting ‘yes’. You can change your mind at any time and click ‘no’ if you’re tired of these emails.
Export your work
You’re probably not ready to export your novel just yet, but when you get to that point, we try to make it easy for you.
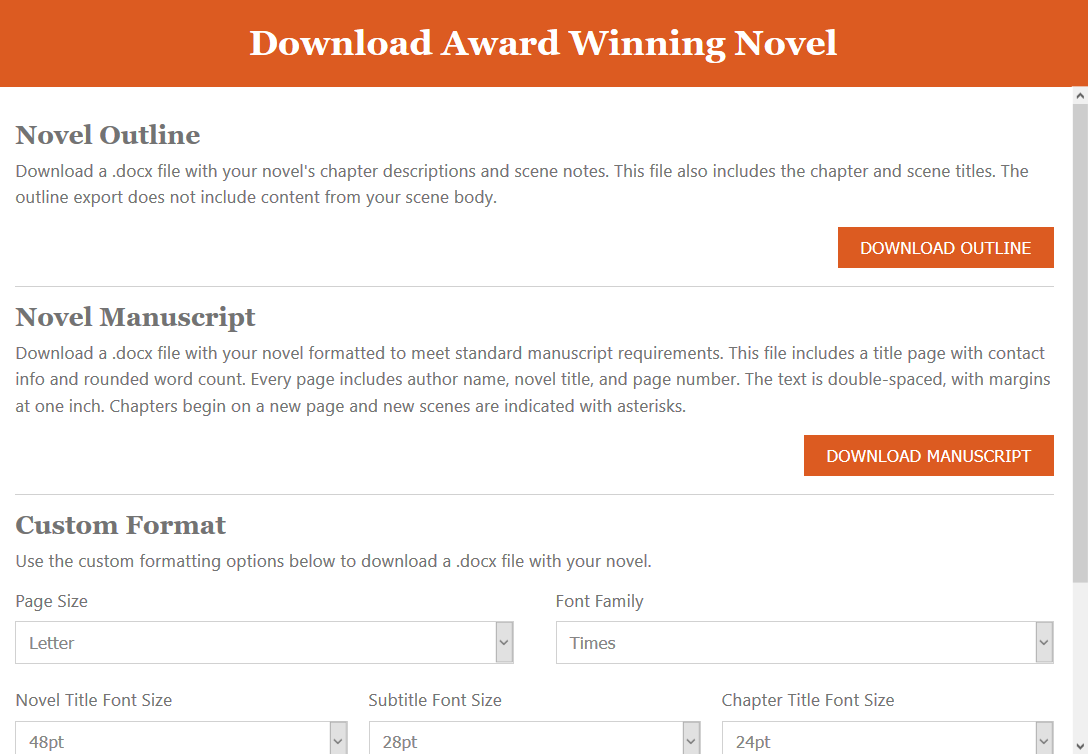
How to export
There are two different locations for exporting your novel. You can do so from inside the regular writing screen. Open the panel and click on ‘manage’, then click the link ‘download novel’. You will see a popup that gives you different options. You can export your outline, a manuscript of your novel, or a custom-formatted Word document.
If you want to export your notebook, click on the ‘notebook’ tab inside the panel. Then go to the gear icon – the last icon on the right. This is the settings button. Here you’ll find a link that says ‘download notebook’.
You can also download your novels and notebooks by going to the dashboard page. When you’re inside of your novel, you can click on the menu button at the bottom right of your screen. From the popup menu, select ‘dashboard’. Here you’ll find all your work. Scroll down to see your notebooks. There is a download icon underneath or next to each of your novels and notebooks. It looks like a cloud with an arrow pointing down.
There’s no limit to how often you can export, so you can try this out right now even if you haven’t written much.
The manuscript export
The goal is for you to get your novel written to send it to an editor, agent, or publisher. Most submission requirements specify that your novel must be formatted in a certain way. We have created the Manuscript export option to help you meet these requirements. Here is what the manuscript export entails:
Times New Roman Font
12-point font, double spaced
Your contact information in the top left corner of the title page
Word Count (rounded to the nearest thousand)
Author name, title of novel, and page number on the top right of every page
Changing manuscript information

If you need to change or add your contact information, you can do this by going to the account page. You can add your address in the manuscript information fields, and the export will pull it from there. We do not use your address for anything else but to add it to your manuscript for proper formatting. If you want to publish under a different name, you can change the author name, title, and subtitle by going back to your novel, and clicking the ‘manage’ button on the top.
Manage your Novelize account

To manage your account, click on the ‘menu’ button at the bottom right of your screen. Select ‘account’ from the options to get to the account page.
The account page is where you can change your name, email address, payment information, and settings. This is also the place to update your credit card if you want to use a different card or your current card expires. If you signed up for a monthly account, you can upgrade to an annual account here as well. You can upgrade to an annual plan anytime. We’ll prorate the amount to take your most recent monthly payment into account.
Settings

There are a few settings you can choose from that will be applied to your entire account. Thanks to user requests, we have added the option to change your time zone. This ensures that the time saved is displayed according to your time zone and the new day and week starts at midnight for your location.
You have the option to choose between light and dark mode. You can also adjust the font type and size. We have set the default to a sans serif because that has been shown to be easier on your eyes. The display font has nothing to do with the font inside of the export. You’ll get to choose that separately in the custom export or it is automatically selected in the manuscript format as per standard manuscript formatting requirements.
Support
We have a support page with frequently asked questions you might find useful. Just select ‘support’ from your menu options. If you can’t find what you’re looking for, this is a great place to get in touch with us, too. You can send us questions or feedback about Novelize. We answer all support messages as quickly as possible.
How to close your account

Obviously, we don’t want to see you go. After all, you just found us! But we know that Novelize isn’t the right choice for everyone. You can close your account at any time by going to the account page and clicking on the ‘close account’ button at the bottom of that page. Before you close your account, please make sure to export your information. Even if you don’t want to write your novel with Novelize, we still think you should get your novel written. If you just want to take a break from writing, you can cancel your subscription without closing your account. You’ll still have access to export all your novels and notebooks via the dashboard page.
Are you ready to write?
Now that you know how Novelize works and what it can do for you, there are no more excuses holding you back. It’s important to make writing a habit, so that you can hold your next book in your hand that much sooner. And when you publish your next novel, be sure to let us know so we can share the news!
How does Novelize help you write your novel?
Writing a novel isn’t easy. When you’re a writer, you may feel compelled to write, but that doesn’t mean you won’t feel frustrated with the process. So you should take all the help you can get. Finding a great novel writing program is a good first start. Obviously, we’re prejudiced and think that Novelize is the best tool for novel writers. But many of our writers think so, too. What makes Novelize so great for novel writing anyway?
1. There’s nothing to do but write
There are a million ways to procrastinate instead of writing a novel even after you open up your writing program. You can set up your page, change your font type, font color, and font size. Maybe you can play with the background color, too. Is any of this going to help you write? No. It’s distracting you from getting to work. With Novelize, we made it easy for you by not giving you too many formatting options in the first place. You actually have to go to your account page to choose from a tiny selection of font styles. Is the font type we chose everyone’s favorite? Probably not. But it’s legible, and it’s easy to read, and there’s no reason why you shouldn’t just start writing.
If you want to play around with formatting, then you should use something like Scrivener. If you want to get your novel written, give Novelize a try.
2. It keeps your important information accessible
When you’re writing a novel, you have to keep track of the details. For example, you need to write down the names of your characters, important dates of events in your story, and other notes. Instead of using a notepad or taping sticky notes around your monitor, Novelize provides you with a notebook. You can open the notebook without leaving your writing screen. This means you can look up information without getting sidetracked from what you were doing. It all comes back to the fact that if you’re not writing, then you’re not making progress. Novelize makes it easy for you to stay on track.
3. You can use it anywhere on any device
Novelize works on any device with a browser and an Internet connection. If you’re waiting at the doctor’s office, you can pull out your Smartphone and get some writing done. If you get a chance to do some writing during working hours, you can do that without anyone being the wiser, unless they’re keeping tabs on your Internet activities. Not we condone working on your novel while you’re being paid to do other work...
How to dictate your novel with Novelize

Several customers have asked us about using Novelize in combination with dictation software. Up until recently, we didn’t think Novelize could be used that way, but then again, we haven’t personally tried. We prefer to type. But we have good news. If you want to dictate your novel with Novelize, you can!
Dictate your novel with the Gboard keyboard
It’s fairly simple to use Gboard with Novelize. Gboard is a smart phone keyboard app that works for Android phones and iPhones. You can install Gboard on your phone by opening the Google Play Store app on your phone and searching for the Google Keyboard. After Gboard is installed, you’ll need to go into the ‘language & input’ settings on your smart phone and look for the current keyboard option. To start using Gboard, you’ll have to select Google Keyboard from the options. When you open up any text field (such as your current scene inside of Novelize), the Google Keyboard should now be your default.
To use the new voice dictation feature, you just need to hit the little microphone on the right side of Gboard. Depending on which phone you use, you may need to activate the dictation function by holding down the space bar. Everything you say will then be translated into text. Be prepared for it to take a few tries until you get the right tone of voice and speech pattern down. Happy dictating!